
Add 5k to your business in 90 days
Guaranteed Success, or We’ll Invest €1,000 in Your Business!
If you don’t see results within 90 days, we’ll give you €1,000 to ensure you do. That includes:
- €500 for a professional content creation day.
- €500 for ad spend to attract more customers
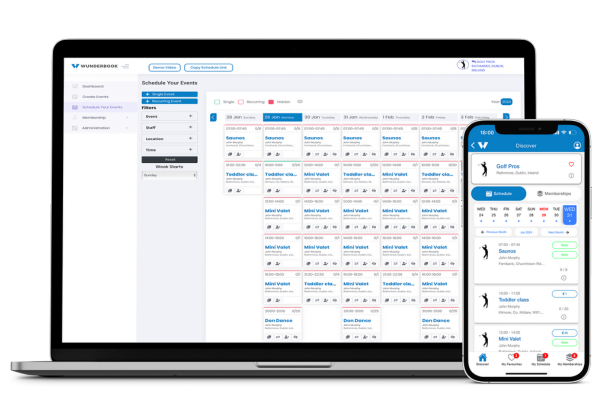
Creating a Term Membership
Objective
This SOP outlines the steps to create a term membership for Pilates sessions, ensuring all necessary preparations are made for user bookings.
Key Steps
Step 1: Set Up Schedule 0:00
Ensure that the schedule is set up with classes available for users to book into.
Confirm that there are events ready for the term membership.
Step 2: Create a New Term Membership 0:22
Navigate to the ‘Single Payments’ section.
Click on ‘Create a New Term’.
Name the term (e.g., ‘September-October Term’).
Set the price (e.g., $60).
Step 3: Define Term Duration 0:30
Instead of selecting a duration, choose an end date for the term.
Set the end date to the end of October.
Step 4: Specify Sessions and Access 0:37
Specify the number of sessions included (e.g., 6 sessions).
Ensure access to the Pilates sessions is included.
Step 5: Save the Term Membership 0:45
Click ‘Add’ to include the term membership.
Press ‘Save’ to finalize the creation of the term.
Step 6: User Booking Reminder 0:56
Remind users that they must book their classes after purchasing the term membership.
Step 7: Verify Membership in App 1:08
Copy the membership link and open it in a new tab to verify.
Check that the term membership appears in the membership section of the app.
Step 8: Disable Membership After Term Ends 1:36
After the term ends, tap the ‘I’ icon to disable the membership so that no further purchases can be made.
Step 9: Repeat Process for New Terms 1:43
Follow the same process to recreate new term memberships as needed.
Cautionary Notes
Ensure that the schedule is fully prepared before creating the term membership to avoid confusion.
Double-check the end date and session details to ensure accuracy.
Tips for Efficiency
Use a template for naming and pricing to streamline the process for future term memberships.
Keep a checklist of steps to ensure nothing is missed during the creation process.
Link to Loom
our Growth program
What you get
- 1 x 1 hour onboarding call
- 3 x 30min check up calls
- Social media review & strategy. Inc what and when to post
- Pricing review & strategy
- Growth Strategies
- Retention Strategies
Proven results

+233%

+390%

+67%

+78%
All your booking needs
Minus the cost and commitments
IT'S FREE
We don't charge our companies to use our software, we charge a small 2% booking fee.
Connections
Connect with 50k+ potential clients instantly, via our geolocations feature. Growing 100+ per day.
Simple
No app, no problem. Simply share your unique schedule link via What's app, Socials or Website buttons.
- User friendly app
- Simple scheduling
- Geolocation
- No contracts or commitments
- Memberships
- Discount codes
- Automated Refunds
- Cancellation & booking limits
- Waivers
- Push notifications
- Apple & G-pay
- Vouchers
- Shop
- Integrated staff app
- Dynamic Analytics
- AI learning
Questions?
We’ve got you covered.
When are the monthly calls?
These are worked around both parties schedule and are adjusted to suit both parties.
Am I guaranteed to get in?
Unfortunately not, we only take on 3 new applications per month and the parties have to be in a position to put some time and effort into their business first, so this is why we have a discovery call.
If you are a good candidate and we can’t get you in straight away, we normally just put you in for the next free available slot.
What in it for Wunderbook?
If you understand our model of not charging companies to use our software but charging a small 2% booking fee to the end user. Then you will understand that the better you do, the better we do.
This is why we put together this program, from years of learning from hundreds of companies and the best practices. The more we share and help our communities grow the better it is for everyone.
How much time will it take to implement everything?
At Wunderbook, our mission is to save you time and add value to your business.
We have done most of the heavy lifting for you but you will be required to do some work 😉 we estimate it at 1-3 hours per week. Obviously the more you put in, the more you get out but we want most of your time with your clients, adding value were it matter most.
Can I join if I am already a Wunderbook customer?
Yes of course, please just reach out to use and we will look after you.